Nick Apseloff 1st Quarter
Contents
Goals
1. Set up a small network of 3 computers using a hub. [X]
2. Research packet sniffers. [X]
3. Intercept instant messages sent from one computer to another on the network. [X]
4. Intercept instant messenger password information sent during log-in. [X]
5. Intercept log-in information sent when someone logs onto Gmail. [X]
6. Intercept Gmail chat messages using the packet sniffer. [X]
7. Intercept an e-mail sent through the hub from another computer on Gmail. [X]
8. Research SSL/TLS. [X]
9. Make an ethernet cable to connect the switch to the new firewall. [X]
10. Set up the firewall for the network. [X]
Documentation
Goal 1 (The network)
Willie Stehm, AJ McLennan, and I set up a network of three computers. We installed Xubuntu 8.04 (a Linux distribution) on each machine and then networked them together using ethernet cables (like the own shown at the top of the page) and a hub. We= chose Xubuntu as our operating system because it is completely free to download and use and requires much less memory to operate (which was a necessity since all three computers are relatively old).
Goal 2 (Packet sniffers)
A packet sniffer is a device or program that allows eavesdropping on traffic traveling between networked computers.[1] Every time you view a webpage or communicate with someone over the Internet, your computer sends packets requesting something and you receive packets with what you requested. In the example of a webpage, you send a request to the server that holds the webpage information, the hypertext is sent to you, and your browser converts that hypertext into a viewable site. But when those packets are intercepted by another machine, they can analyze them and monitor your traffic. They can sometimes even see things such as passwords or other sensitive information sent. Packet sniffing has practical uses like observing Internet usage at schools or offices.
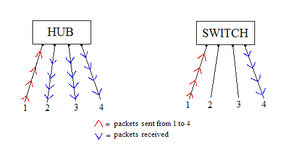
The reason that packet sniffing will work on our network is because we are using a hub, rather than a switch, to connect our computers. Hubs broadcast the packets sent by one computer to all ports, so viewing the packet activity of another computer is quite simple (see Figure A). On the other hand, switches send the packets to only the desired port, so others on the network cannot listen in on your traffic. Switches have replaced hubs almost entirely because of this blatant security flaw, but hubs are still used in some situations such as where security is not a necessity.
Goal 3 (Instant messenger messages)
We initially tried to get the program 'talk' working on the machines so we could easily send messages between two of the computers in an attempt to view the packets transmitted on the third computer. After a few days of trying to get it to work, with no success, we settled on using Pidgin (a messenger client that is compatible with AOL Instant Messenger).
We then downloaded a packet sniffer called 'Wireshark' and ran it on one of the computers. On AJ's computer, he signed onto AOL Instant Messenger using his own screen name. By changing the display filter of the packet sniffer to only show AIM packets, we were able to see his screen name when he logged on. It was difficult to decipher which packets corresponded to what he was doing, but after getting familiar with the descriptions of the packets it was easy to pick out the ones that were messages. We were able to read outgoing and incoming messages as well as buddy info that the other computer was viewing.
Goal 4 (Instant messenger password)
On Willie's computer, I typed in a random password to sign on just so I could see if we could view the password sent to AOL. We found the outgoing packet and not surprisingly, the password was not sent in plain text; it was sent as a password hash using the MD5 algorithm, short for Message-Digest algorithm 5. This algorithm uses a one way hash function (one way meaning that the function cannot be reversed) that translates the password to a 128-bit hash value (32 characters consisting of 0-9 and a-f). The purpose of the password hash is to prevent exactly what we were trying to do. We successfully sniffed the packet that contained the password sent, but all we got was the following irreversible password hash: 51e3ed91700bee528a11e333ab25e6d2. In Layman's terms, when you type in a password to sign into something, the password gets jumbled up into random letters and numbers before being sent, so anyone trying to steal your password by sniffing your packets will not be able to, or at least have a very difficult time doing so. It is theoretically possible to recover a plain text password from an MD5 password hash using a rainbow table, in which the hash value is compared to an extensive list of known hash values and their plain text form, but this is not a very feasible tactic. A seven character password has 6.98 x 10^13 possible combinations, and having a hash list of every single one of them would require hundreds of terabytes of storage.[2]
Goal 5 (Gmail log-in)
After our success with sniffing instant messenger packets and log-in information, we decided the next step would be to try to do the same with e-mail. When I loaded the Gmail log-in screen while sniffing packets on another computer, I noticed that Gmail uses a SHA hash function (Secure Hash Algorithm) in addition to RSA encryption when submitting your username and password to sign in.
RSA is recognized as one of the first encryption algorithms (1977) and is still used widely today. In the algorithm, there is a public key which is available to everyone and is used for encrypting messages, and there is a private key which is obviously kept private and is used for decrypting the messages encrypted by the public key. RSA is difficult to crack because the private key consists of two very large prime numbers, p and q, and they are multiplied together to get N. In order for someone to figure out the values of p and q, the private key, they would have to factor N, which would be extremely difficult considering the fact that p and q are both prime numbers possibly 100 to 200 digits long.[3]
The SHA hash function is similar to the MD5 hash function described in goal #2, but uses a 160-bit hash value instead of 128-bit. This means that the SHA hash is much harder to decrypt than MD5.[4]
Goal 6 (Gmail chat)
Since Gmail only uses encryption for logging into your account, we figured it would be possible to intercept and read Gmail chat activity. On Willie's computer we had Wireshark running and sniffing packets with a display filter only showing HTTP packets. We were unable to locate the packet that contained the message when AJ sent an e-mail from his computer, but it was surprisingly easy to intercept his Gmail chat conversation.
We started by looking at all of the packets that had the word 'mail' in the description header. The packets that had the word 'POST' in the description were Gmail chat packets, and we began to look through the detailed packet information. We found AJ's e-mail address, the e-mail address of the person AJ was chatting with, and even the text AJ was sending to that person. Another interesting thing we discovered was that every time AJ moved his mouse, a packet would be sent with the text "mouse_move" in the details. We deduced that this packet is what determined whether his computer was idle or not, and after a certain amount of time of him not typing and not moving his mouse, Gmail chat would automatically set his status as 'idle'.
In addition to seeing his chat activity, we were able to read messages from his inbox. Gmail refreshes the inbox after a certain period of time, and doing so resulted in an incoming packet that contained all of his inbox messages in plain text form. We were able to read the address of who the e-mail was from, as well as the subject and body of the e-mail.
I had previously assumed that the Gmail chat would be encrypted, but after further research I figured out more reasons why we were able to read AJ's messages. When communicating over Google Talk using the downloaded program, similar to AOL Instant Messenger, the connection is encrypted, but when using chat over HTTP in Gmail, there is no encryption.[5] This is a serious security flaw that obviously can be exploited with ease. I never would have known that there was no encryption had I not been experimenting with it. Essentially, sending information over a non-encrypted connection is like sending information to someone in a postcard; anyone who sees the postcard can read what is written on it because there is no form of security.
Goal 7 (Gmail e-mail)
It took a lot of tedious searching through packet contents to find it, but we were finally able to sniff an e-mail packet and read the text sent.
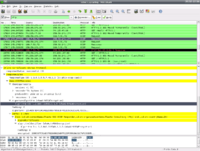
AJ sent an e-mail from his personal Gmail account to the account that we made (sniffmypackets@gmail.com) with the text "can you hear me now?". As you can see in the picture to the left, after digging through the packet details we found the data chunk that contained the body of the e-mail. Also, if you look up a few rows, you can see "test 3", which was the subject of the e-mail.
The reason that we were able to read the message without any trouble was the same as in the last goal. Gmail does not use any encryption for chat or e-mail; they only encrypt your log-in information.
Most Gmail users are completely unaware that the e-mails they send are completely unencrypted. This issue is surprisingly easy to fix, though. If you go into Gmail browser preferences, you can turn on SSL encryption by enabling 'https'.[6]
Goal 8 (SSL/TLS)
The SHA hash and RSA encryption algorithm from goal 5 are used in combination to form Gmail's SSL cipher.
SSL stands for Secure Sockets Layer, and it is a protocol designed by Netscape that accepts many different ciphers for secure communication over the Internet. This protocol, or set of rules, "allows an SSL-enabled server to authenticate itself to an SSL-enabled client, allows the client to authenticate itself to the server, and allows both machines to establish an encrypted connection."[7] It works mainly through public/private key encryption like the RSA concept.
TLS stands for Transport Layer Security, and it is the successor of SSL. Created by the Internet Engineering Task Force, TLS is very similar to it is more versatile with working on different ports and uses stronger encryption algorithms.[8]
The two are used in client-server transactions, like e-mail and instant messaging, and ensure that information is sent privately and has integrity. The algorithms used by both security protocols are very strong and difficult to break, which is why we would have a very hard time figuring out a password that we found in a Gmail log-in packet.
Goal 9 (Ethernet cable)
In order to complete our next goal (set up a firewall for our network), we had to have an ethernet cable around 15 feet long. The only cabling that we had to use was either nonfunctional or too short, so we had to make a cable of our own. We cut a length of cable off of a giant spool and gathered our tools together. We needed a splitter, a crimper, and two cable heads.
An ethernet cable consists of a plastic casing around 8 different colored wires. The splitter is used to cut about an inch of the plastic casing off of the end of the cable so that the wires are sticking out. The wires are in 4 pairs of 2, and the pairings are done by color (brown, blue, orange, and green; each pair has a solid and striped wire of each color). We then untwisted the pairs and straightened out each individual wire. For a category-5 ethernet cable, the order of colors in the cable head from left to right is green stripe, green, orange stripe, blue, blue stripe, orange, brown stripe, brown. We put them in this order, straightened them out, and cut the tips to make the end flat in order to insert them into the cable head. We slid the wires into the head of the cable, making sure they fell into the slots and the pins lined up and then crimped the head to permanently lock the wires into place so they don't fall out. The end product looked like the picture of the ethernet cable at the top of the page.
Goal 10 (Firewall)
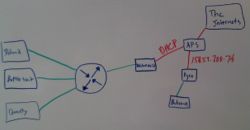
We started this goal by drawing a layout of our network and Mr. Bui's lab (shown to the right). The room consists of two firewalls connected to the Arlington Public Schools wide area network. Mr. Bui's firewall is connected to the lab and our firewall is connected to our mini-network. The circular symbol with the arrows is a hub.
We set up the firewall to use dynamic host configuration protocol (DHCP) for our network, which means that the computers would be automatically assigned an IP address. The firewall is a computer with two network interface cards, one of which is the 'red' interface and the other is the 'green' interface. The red interface card is connected to the Arlington Public Schools network and the green interface card is connected to our hub that branches out into our mini-network.
We installed IPCop, a Linux firewall distribution, on the machine that we designated as our firewall. After a lot of tweaking and trial and error, it was set up and working. The reason that we set it up was to be able to perform other network security projects in the future involving the firewall.
References
- ↑ http://www.wisegeek.com/what-is-a-packet-sniffer.htm
- ↑ http://blog.passwordresearch.com/2007/08/how-password-policy-requirements-impact.html
- ↑ http://mathcircle.berkeley.edu/BMC3/rsa/node4.html
- ↑ http://msdn.microsoft.com/en-us/library/aa302352.aspx
- ↑ http://groups.google.com/group/Calls-Chats-and-Voicemail/msg/e49343f783a06a1e
- ↑ http://www.quickonlinetips.com/archives/2008/07/secure-https-gmail/
- ↑ http://docs.sun.com/source/816-6156-10/contents.htm#1046261
- ↑ http://kb.iu.edu/data/anjv.html


