Ross Bayer
Fourth Quarter - Objective-C / Ruby / Ruby on Rails Dev
Fourth Quarter I intended to lern about the mac development language Objective-C, which is a strict superset of the C language. However since hearing of the internship with Mr. Sandridge this summerI have cut short the Objective-C dev and decided to work on Ruby, Ruby on Rails, JavaScript, HTML5, and CSS3.
My Goals:
- Read "Learn C for the Mac"
- Completed to an extent, I read a little over 2/3rds of the book, but in the last 100 pages it reviews two programs, almost identical. One can save data to a .txt file and the other cannot, otherwise, no difference.
- Read "Objective-C Visual Quickstart Guide"
- Completed. Good book to learn syntax. All of the exercises are on my iDisk.
- Ruby On Rails Tutorial
- http://ruby.railstutorial.org/ruby-on-rails-tutorial-book
- This is my project for the summer and end of this quarter. I will be using ruby and rails in the internship with Mr. Sandridge.
Work: Will be available on my iDisk: https://public.me.com/rmbayer94
Third Quarter - Java
For this quarter I was assigned as the guinea pig for the intro to java programming curriculum my IB Computer Science 1 class will use in fourth quarter. As of now I am fiinshed with the first and only unit I will be doing. These 22 different labs took much longer than anticipated. Some were very confusing. Follow the link below to my public iDisk where you will find the complete Unit1 eclipse project containing Lab0 - LabYY(22 in total) another fil fill of the lab exercises and lastly an analysis of the Labs themseleves, my little critique.
- This link is to my public iDisk, where my stuff is for this quarter.
- https://public.me.com/rmbayer94
Second Quarter - Java
I plan to learn the basics of the java programming language. I will use a few different books on the subject. This will carry over into the thrid and possibly fourth quarter.
My Goals for this quarter aren't actual goals, but more like road makers. Since I will be teaching myself Java, I intend to be knowledgeable in some specific areas of the language by the end of the first semester. I want to learn about ten big concepts in the Java language, they are listed below with either a brief description of what it is or some sample code to illustrate what it does.
Goals/Things-I-Learned:
1. Hello, World!
- This is the first program that I have learned. The basic program most everyone begins with, it's purpose: print "Hello, World!" on the terminal window. Here's the code.
 public class HelloApp
 {
   public static void main(String[] args)
   {
     System.out.println("Hello, World!");
   }
 }
2. "OO" Programming, what is it?
- Java is, what is known as an Object-Oriented programming language. This means that instead of writing lines of code or functions to be run through in order, you create what's known as objects. Each object is created through a class and an instance of it is called in the program. Objects interact with one another like the different components of a stereo system as one of my sources explained it. The stereo system as a whole is like the completed program working seamlessly to play all you favourite tunes. But each components, like the sub-woofer, the speakers, cd-player, etc... are like instances of a class. These objects work together to make a stereo, but separate are worthless.
3. Classes
- A class is like a mould for an object. It dictates what it can do when it is made. Here is an example of a class:
 public class HelloApp
 {
   static String helloMessage;

   public static void main(String[] args)
   {
     helloMessage = "Hello, World!";
     System.out.println(helloMessage);
   }
 }
- This segment of code defines a class "HelloApp" which has one variable it can use, "helloMessage". It then uses the main method to print what is stored in the variable on the screen. It prints "Hello, World!"
4. Methods
- A method is at its core a function inside a class, but the fancy "OO" people like to call them methods. Every program in Java has one "Main" method that starts the program and a lot of other methods inside the classes for functionality and to interact with other classes inside the program. Hence the objects can interact with one another. Here's and example of some methods inside a class:
 public class DiceApp
 {
  public static void main(String[] args)
  {
    int roll;
    String msg = "Here are 100 random rolls of the die.";
    System.out.println(msg);
    for (int i=0; i<100; i++)
    {
      roll = randomInt(1, 6);
      System.out.print(roll + " ");
    }
    System.out.println();
  }
  public static in randomInt(int low, int hight)
  {
    int result = (int)(Math.random() * (high - low + 1) + low;
    return result;
  }
}
- This little program is designed to display 100 rolls of a die and display them in line with one space between them. This program uses two methods. First the "main" method and second the "randomInt" method. the "main" calls the "randomInt" method to find the random number then it returns an integer value which is stored in the variable roll then displayed on the screen.
5. Inheritance
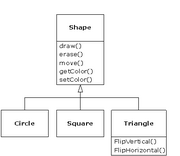
- Inheritance is the relationship between a class and an object. The best way to explain is with a diagram so here is one I found on the internet:
- In the image to the left, there are four boxes. The box "Shape" is the class and the three boxes below are the classes created from the larger class. Inside shape there are five methods (these method look something like draw()). all of these methods in the class Shape are inherited by the classes below it.
- The technical term for shape would be the Superclass and the classes inheriting from it are known as the Subclass. All the subclass objects inherit variables and methods from the superclass unless they are overriding methods(a method inside a subclass with the same name, but different purpose that the method in the superclass). The Triangle class has a few extra methods it uses that aren't inherited but defined inside the triangle class itself. these methods cannot be used by the two other subclasses, but if triangle had subclasses of its own then those could use the two methods defined in the triangle class.
- If you want to find out more about classes and inheritance check out the book Head First: Java, they have an excellent description and overall it is the best book to understand more abstract concepts with.
6. Dot.Notation
- Dot notation is still an odd subject for me. Dot notation is the use of a . to call methods from a class. Here's and example, but without the rest of the program listed above(the 100 dice roll app):
 Math.random()
 System.out.print()
- This is calling a method from the Math class in the Java library known as random(). This particular method creates a random number(I don't know how but it does.) and the other example System.out.print() calls a method from the System class and then the subclass out and finally the method print() which displays words on the terminal window.
7. Variable Types
- In Java and every other programming language there are different types of variables. There are ones that can hold text like a String or those that hold numbers like int or float. However in Java and C unlike Python, to use a variable it must be declared what type of variable you want to utilise. Otherwise the Java compiler spits back an error or heaven forbid you use the wrong type of variable it spits back an even more obnoxious error essentially saying, Stupid, why would you put an integer inside a String variable?". So long story short use the right variable type. For example:
 int IntNumber;
 IntNumber = 20;
String message = "This text belongs in a string variable";
- Also there are "primitive" and "reference" types of variables, but I won't get into those right now, If I must I will explain them in next quarters goals/things I learned.
8. Math!
- Java can accomplish large and small things, like make a game complex game for the web(Minecraft) or do simple math with either the Math class in the Java library or simple math operators. Here's an example of some simple math:
 2 * 2
 4

 9 / 3
 3

 4 + 10
 14

 9 - 7
 2

 6 % 2
 0
- These are the simple math operators, "*" is multiplication, "/" is division, "+" is addition, "-" is subtraction, and "%" finds the remainder(called the modulus operator). Then there is stuff from the math class that lets you round and find a random number, etc... Overall the math is simplistic, but very important.
9. Loops
- Looping is in my opinion either the most or second most important part of programming. A loop is a section of code that runs multiple times in order to accomplish a task multiple times. There are a few kinds of loops like the "while" loop or the "for" loop. Each runs a little different from the other. Both require a counter or a means to end the loop so as it doesn't become an infinite loop that eats away at your memory and most likely crashes the computer. Here's an example of a while loop in a program(a for loop can be found in the dice game earlier on):
 public class BeerSong {
   public static void main (String[] args) {
     int beerNum = 99;
     String word = "bottles";

     while (beerNum > 0) {

       if (beerNum == 1) {
         word = "bottle"; //singular as in ONE bottle
       }

       System.out.println(beerNum + " " + word + " of beer on the wall.");
       System.out.println(beerNum + " " + word + " of beer.");
       System.out.println("Take one down.");
       System.out.println("Pass it around.");
       beerNum -= 1;

       if (beerNum > 0) {
         System.out.println(beerNum + " " + word + " of beer on the wall.");
       }
       else {
         System.out.println("No more " + word + " of beer on the wall.");
       } // end else
     } // end while loop
   } // end main method
 } // end class
- This program produces the song, 99 bottles of beer on the wall by running a while loop 99 times and on the last one changing bottles to bottle.
10. If statements, and Logical Operators
- Lastly there are if statements uses to make decisions and logical operators to help. An if statement checks criteria it is giver for a boolean value(True or False) then completes instructions given to it for each possible outcome. The logical operators are like the ones you see in math, these greater-than ">", less-than "<", greater-than-or-equal-to ">=", less-than-or-equal-to "<=", equals "==", does-not-equal
"!=" along with and "&", or "|", logical and "&&", logical or "||". these are used to define when a loop or if statement should do something. Here is an example out of context:
 if(purchase <= 20.00)
 {
   tax = purchase * 0.07
   checkout = purchase + tax
 }
 else
 {
   tax = purchase * 0.05
   checkout = purchase + tax
 }
- This example code is for a cash-register at a local supermarket or store. It asks the computer if the purchase is less-than-or-equal to 20.00, if yes the tax is 7 cents and the final checkout equals the purchase price plus the tax. If not then the purchase is greater than 20.00 the tax becomes 5 cents(a hot deal day discount!) and the checkout is figured accordingly.
- This is a basic example of what the if statement can do and what a few of the logical operators can do.
Last Words - This concludes my ten goals/things-I-learned for the second quarter in Advanced Topics.
First Quarter Proposal
My Advanced Topics project for the first quarter is to build an easy to update website for my TaeKwonDo studio using a CMS(Content Management System). Through this project I will expand my knowledge about CSS and HTML, learn a little PHP, and Teach myself to use a CMS.
My 10 goals for this project during the first quarter are as follows:
1. Chose a CMS (Content Management System)
- I had first learned of CMSs from Mr. Bui. He mentioned them to me when I had decided to build a site for my TKD school. From then on I went looking. There were many choices available,but I decided on Joomla. Mainly because Wordpress and ModX didn't fit my needs for a simple website meant for my TaeKwonDo studio. Things like Wordpress were mainly coded for creating blogs and the template constructions were far above my level and ModX didn't seem very user friendly. So lastly there was joomla, who as it so happened is very easy to create templates for.
2. Install Xampp (to create a localhost)
- I installed Xampp for Mac by downloading it from here and moving it to the suitable directory, more commonly know in mac as the applications folder. Onece it was set up, I tweaked with a few settings. Once everything was up and running I opened MySQL and made a database for my site. (this was used later for the Joomla Setup)
3. Install Joomla
- SInce I am using a Mac, the installation of Joomla was very simple and easy, unlike my first attempt on a linux machine. All there was to do was download the file from the Joomla website, which I found with the wonderfully powerful tool known as google, and download the joomla zip file. Once I extracted the Joomla folder I renamed it and moved to to the XAMPP folder then to htdocs and there it resides. Once complete, I opened a Safari window(Safari is an internet browser for the mac) and typed in the address
/localhost/FILENAME/installation] and went through the instructions, which had me provide the database name I made earlier and my admin password. Once I was done I deleted the install folder from the Joomla file and went to/localhost/FILENAME/administrator. There I signed in with my admin password and off I went.
4. Search for template
- Joomla is a wonderful program that offers plenty of templates to add your content to, if you search hard enough. I spent about a week on this and found a template I liked, but was unsure of the licence. I didn't want to infringe on copyright so insteaed I began development on my own Template.
5. Template Constuction
- I began construction on my Joomla Template at this and aslo this page. They gave me all the basics I needed. First the simple HTML code and a sample css file to go with it. Since I was already pretty familiar with HTML and CSS, I found the template framework to be comprehensible. I of course added a few things like new colors and background images. I formatted it and molded it until I had the basic shell of a website that I envisioned.
6. Graphics Synthesizing
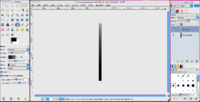
- After the basic template had been established I quickly went about creating my graphics, or at least most of them. I made the shadow for under the header and the header background. Both were created using an amazing open sourced, cross-platform program known as GIMP. Each were gradients of a dark black to a light grey and each is repeated across the x-axis over and over. Once I completed these graphics and put them in place.
7. Template Tweaking
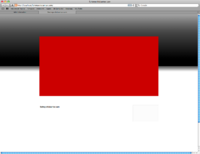
- Because I had the basic frame of my website I began to make it look nice. I added some more divisions to group things together visualy. The CSS is constantly evolving along with my images. At the moment I have place-holders and preliminary images and have lots of work left to do. Things like the menu must still be added to the proper place. I want to add pictures to the front page. In the image on the left the big red box will eventually hold a frame and a set of images that randomly cycle through.
8. Dummy Content and Placeholders
- The next step in my theme process, is to add dummy information, which could also be called placeholder information. Things like Lorem Ipsum, the mumbo jumbo of computer languages(meant to fill space, has no real purpose). I will also add a few placeholder images to give the site a more professional look.
9. Menu Management
- In every website I have ever built the menu always ends up as the most frustrating part of construction. I normally put it off until the end. Luckily for me, this time around was a little different. After having looked around joomla for a while and gotten a feel for the controls I began playing around with the main menu. I added another page "About Us" linked to an Article I called "About Us". The Page was fine, but the menus no where in sight. So in my
index.phpdocument I adjusted a few joomla plugin tidbits and there it was. All that was left was to add style and I was done, with little to no pain at all.
10. Re-Adjusting & More Tweaking
- I ended up not liking a few sections of my template and decided to do a bit more construction on them, I added a new image, played with some spacing, and resized a few components. This template still has a little work left and I know I will spend as much time as necessary to make it properly, present it to Master Camacho and tweak even more if required.
As of this point my draft is still under construction, but I have made a lot of progress and plan to have it finished very soon, meaning the next 2 - 3 weeks. As of now my current draft looks like this ==>


